Tag Archives: macro lense

Enjoying more snowflakes

People love to enter hibernation during the winter. Especially when a snowstorm is causing havoc on the roadways. All it takes is an incredible snowflake landing on my sleeve and I’m addicted. During the cold months of the year I keep much of my camera gear cold so that I can be out taking pictures in an instant. Photographing these little ice crystals is fun but what’s even better is seeing them up close and exploring each ridge or crevice. Many are incredibly beautiful when viewed in detail. I keep trying to get some great photographs of them but have yet to succeed. Viewing snowflakes in a photograph is enjoyable but also disappointing. There’s always an area that’s out of focus and I can never seem to capture. The 3-D aspect capturing each detail that makes them so captivating to me continues to elude my pictures.

The snowflake above is probably the best one to fall in front of my camera over the past few snow falls. I love the clear, symmetrical center and all of the patterns radiating out from the center. I just keep studying each ray and wondering how they formed, fell from the sky with the high winds accompanying that snowstorm, and landed on the purple glove I was using all without breaking.

Ice flower

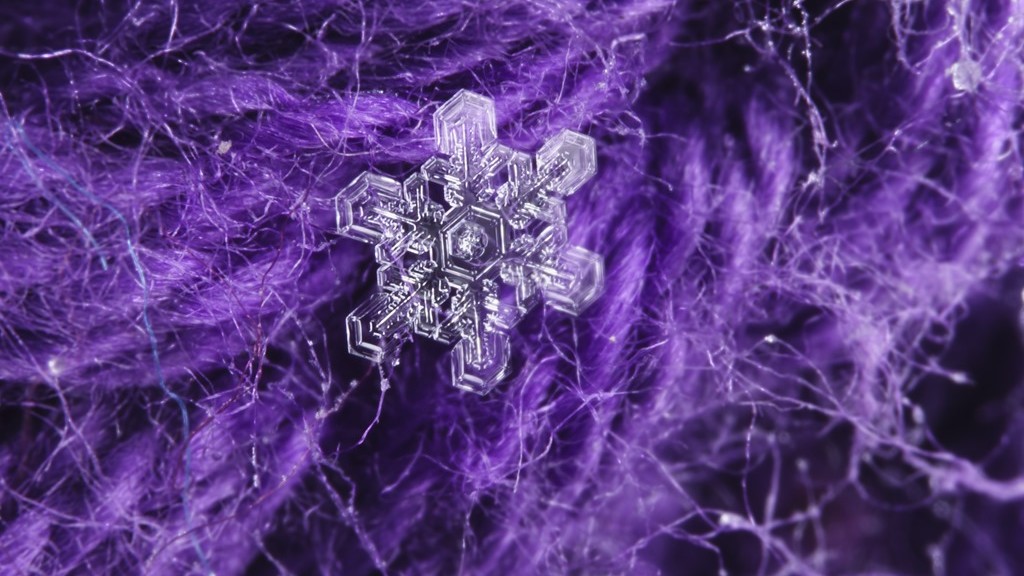
This was another ice crystal that I couldn’t wait to examine up close and capture with the camera. The frosted edges created a beautiful outline of the petals in this snowflake. Again the clear and symmetrical center is so amazing to me. I know the hexagon shape is the base for many snowflakes but it always has me wondering why. What forces cause this to be the most stable formation for ice crystals whether it’s flatter flakes like this or even columnar ones or the multiple combinations in between?

Clear flakes

The group of snowflakes above appear to be incomplete. Like they fell before finishing their design. What could have scared them out of the sky early? More likely they were evaporating before I could capture the complete flake. Most of the time these little pieces of ice art show up better with a darker background but once in awhile I like to see them as a sort of x-ray. It’s just a little different way to view them. Often a single flake makes a beautiful photo but sometimes there are too many interesting snowflakes and the only way to photograph more is to take a picture of a group of them.

Frosty edges

Another snowflake that captured my attention when I first spotted it was the one above. It also has the frosted edges which seems to really highlight the clear ice closer to the center. Such an interesting contrast to me. It also makes it so much more visible against the background. I love the curvy lines in between each ray. What causes that during the formation in the clouds? These make each ray of this flake unique like they were all in slightly different parts of the cloud when they were created.

Below is another group of beautiful ice crystals. Each one different from the one it’s touching. I was experimenting with different backgrounds to see what I like and if I can come up with something different that might still provide an interesting contrast to these snowflakes. Ice crystals are something I’m hooked on. Since these couple of snowfalls the temperatures have warmed just enough that we’ve been experiencing more rain in central Minnesota so I haven’t had more subjects to work with as often. But when I do you can be sure I’ll be out trying to capture better photos.

A group of snowflakes

Snowflakes Are Amazing

As the snow really started to pile up in February there were several opportunities to examine these little ice crystals and become mesmerized by their unique shapes and patterns. Often times I would be concentrating on things I needed to get done, one of which was shoveling all of this fresh snow, and if I took just a moment to look at a few snowflakes I was distracted for hours. I would drag out the camera and shoot away trying to capture each little detail of each flake among the never ending supply falling from the sky. Eventually the cold and the clock would end my session forcing me to wait until the next snowfall.

Snowflake edged in white frost

Once getting them on a computer I could examine each one even closer and study how they formed. What conditions were needed to create these? Were the conditions changing while a snowflake was being made? When multiple snowflakes landed together were they connected or just collided in the sky before settling down on my surface? I was constantly amazed at how different snowflakes look depending on what the temperature was outside.

Snowflake with many arms

Even within the same snowfall the snowflakes would change in appearance multiple times. Sometimes they would be large, branched crystals with ice drops frozen on the edges while other times they would be clear with amazing patterns and at different times they would be fairly non descript pieces of ice. In most forms they are fascinating to look at up close and very challenging to photograph because of their typically small size. Trying to get the entire snowflake in focus is often extremely difficult, if not impossible, unless the snowflake and camera are completely parallel to one another. Still, most of the time, they can be looked at in fine detail and their patterns can be interpreted.

Skinny snowflake

One of the challenges with snowflakes is trying to figure out if there is just one or if there are multiple snowflakes stacked on each other. Which layer is currently in focus? A slight adjustment in focus can be the difference in seeing the snowflakes detail or having it be slightly blurry. Once everything appears sharp than keeping the camera and snowflake perfectly still is required. Hopefully the wind does not blow while taking the picture. All of this needs to be done outside in order to keep the ice from melting and losing any of its detail. While snowflakes are a challenging subject, the results are often worth the effort for each one. Usually over the course of an hour I can photograph four different snowflakes so it is not a quick process.

Clear snowflake

Getting Close part 2

Another method of macro photography is to use a larger telephoto lens and zoom in until you get the composition you’re looking for. For the photograph above I set up a tripod with the camera and focused on this grouping of flowers. After taking a few test shots to make sure I liked the composition and the lighting was adequate for a fast enough shutter speed I just waited for a bee to come along in the exact position I was looking for. Seems simple enough, right?

Setting up the shot

But there’s a little more to the story. In order to get a picture with this composition the lighting needed to be right which only occurred for about an hour just before sunset so it took me two nights of setting up in this location to accomplish my goal. Setting up involved getting to this location about an hour before the light would hit these flowers, hiking into this spot which took about 15 minutes, and getting the tripod, camera, and lens put together in the same location with the right height. Above you see a test shot to make sure I liked the set up.

Just a bit out of focus

What’s not shown is there were multiple test shots where I adjusted the focus and shutter speed until I got to this point. While doing this there was a lot of second guessing. Would I even be able to get a bee in focus in the small area of focus to make this an interesting image? Was my shutter fast enough? How fast should it be? Do I want to stop the wings in flight or is it ok to have them blurry from their fast movement? Those questions were answered with a little patients. Once the sunlight moved to this area it didn’t take real long for a bee to make its way to these flowers. Using a remote shutter I started shooting away as the bee moved in and around these flowers. You can see it doesn’t take much to have the bee out of focus.

Pulling the flower down

After reviewing those photos I determined I would stick with my setup and wait some more. Thankfully a few minutes later another bee entered my photograph and again it was out of focus plus this time it pulled the whole flower stem down changing the whole composition. I wasn’t going to adjust the camera for this because once this bee left and the flower stem bounced back up I would be going through the whole focusing again so I just waited for another bee.

Getting closer

Over the course of an hour several bees visited. Some where in focus and others were not but eventually I captured the photograph I was looking for – a bee hovering in front of an in focus flower. There was actually quite a bit of work involved but it was fun just to be out there amongst the bees and flowers watching as they moved from one flower to the next. It was also a good learning experience with a successful photo that matched what I had imagined ahead of time. In addition it was a nice summer evening on both nights and hummingbirds kept me entertained, or distracted depending on how you look at it.

Another one almost in focus

Getting Close

Recently I’ve been out having fun with macro photography. Certainly this presents some different challenges but provides some great images. There’s multiple ways of accomplishing some of these close-ups and each provides a little different result. You can use macro lens designed for this type of photography or telephoto lenses zoomed in. Some people even use microscopes to get really close. My method of choice is to use a small telephoto lens with extension tubes for these images. Extension tubes allow you to get quite a bit closer to whatever you are photographing for some really close-up photographs.

Almost open

Some of the challenges for this type of photography are getting adequate lighting, acquiring the right focus as the focus area becomes substantially smaller, and maintaining your desired composition. Lighting can be a challenge because your lens is so close to your subject that it blocks out light. Be careful of your camera placement or your own shadow may be in the picture.

Full of pollen

For these images of Black Eyed Susans, here’s my setup: I move my camera around using the screen to compose a potentially interesting photograph until I find where I want to take the picture from and then I set up a tripod to position my camera in that location. Once I’m all set up I plug in a remote release so there is a little camera shake as possible and wait for good light as on this day there were clouds passing by. There was also some wind blowing around the flowers so I waited until they would stop moving after a gust. Also, I did this in the middle of the day as morning or evening light would reduce the amount of light for a sharp picture. I snapped the first photo and checked to see that the focus is where I want it. If it’s not, an adjustment to the shutter speed or aperture can help especially if your lucky and an insect enters the flower such as a couple of them seen here.

Wrapped in spiderwebs

How to Hold a Camera

Drying Tomatoes

There’s not a lot of exciting things to say or show regarding holding your camera. One of the things I did learn about how I hold my camera is my arm position. According to Peter’s video (found here), holding your arm at you side can produce slightly less shaking. I naturally hold my arms slightly away from my body while shooting photos so this is one area I will continue to work on correcting.

An Orchid Flower

While practicing I decided to also practice with my macro lens so these shots are all close ups. I decided this because I attempted to use this macro lens a few weeks ago and realized I was using it incorrectly. Amazing how much better the photos look when using a lens the right way. How was I using it incorrectly you ask, simple: I was trying to use it as a wide angle lens. I know, what kind of moron would confuse a macro lens with a wide angle lens? Apparently me that’s who.

One of my Rainbow Darters

After noticing the photos where turning out blurry on the edges I searched how to use a macro and realized my idiotic mistake. Kind of feel stupid now. Error learned and shouldn’t happen again. Now I want to look at wide angle lenses as well.

Blue Devil Damsel

Since I’m a horticulturalist I tend to photo landscapes, plants, and animals. I may be more of a naturalist but have a horticulturalist degree. Is that enough “ist’s” for you?

An Impatiens Plant in Flower

Apparently I found another use for a macro lense when plants are concerned. When looking at this photo on the computer I realized this plant has spider mites which you may be able to see on the lower right leaves. This plant was immediately treated after seeing this photo.